
Funny story my mom is always curious about my latest nail art experiments. The other day, she caught me trying out a new simple nail design and said, “You have to show me how you did that!” I’ll admit, it wasn’t anything complex, but it made me realize how much a small pop of nail art can spark joy. It reminded me why I love playing with nail art. It’s a simple yet powerful way to express my personality and style. If you’re just starting or looking for something simple yet stylish, here are 28 nail design ideas that are beginner friendly and sure to dazzle.
Understanding Nail Design Fundamentals
Before diving into the simple nail art designs, let’s first discuss the basics. Your nails are the canvas, and the shape of that canvas plays a huge role in how the design turns out. I’ve noticed that the shape of your nails can dramatically impact the overall look of your design. Choosing the right nail shape will help you highlight the beauty of the art you create.
Some Popular Nail Shapes
Oval Nail Shapes
Known for being universally flattering, oval nails elongate your fingers, making them look more stylish.
Squoval Nail Shapes
If you’re like me and want something modern but practical, this blend of square and oval nails is super versatile.
Almond Nail Shapes
These are so perfect for adding a touch of drama. It’s ideal for adding a dramatic touch to your look, whether for everyday wear or special occasions.
Coffin/Ballerina Nail Shapes
These shapes are perfect for creating intricate designs. Many nail artists consider them a perfect canvas for unique, eye-catching nail art.
1/28
Matte Meets Glossy
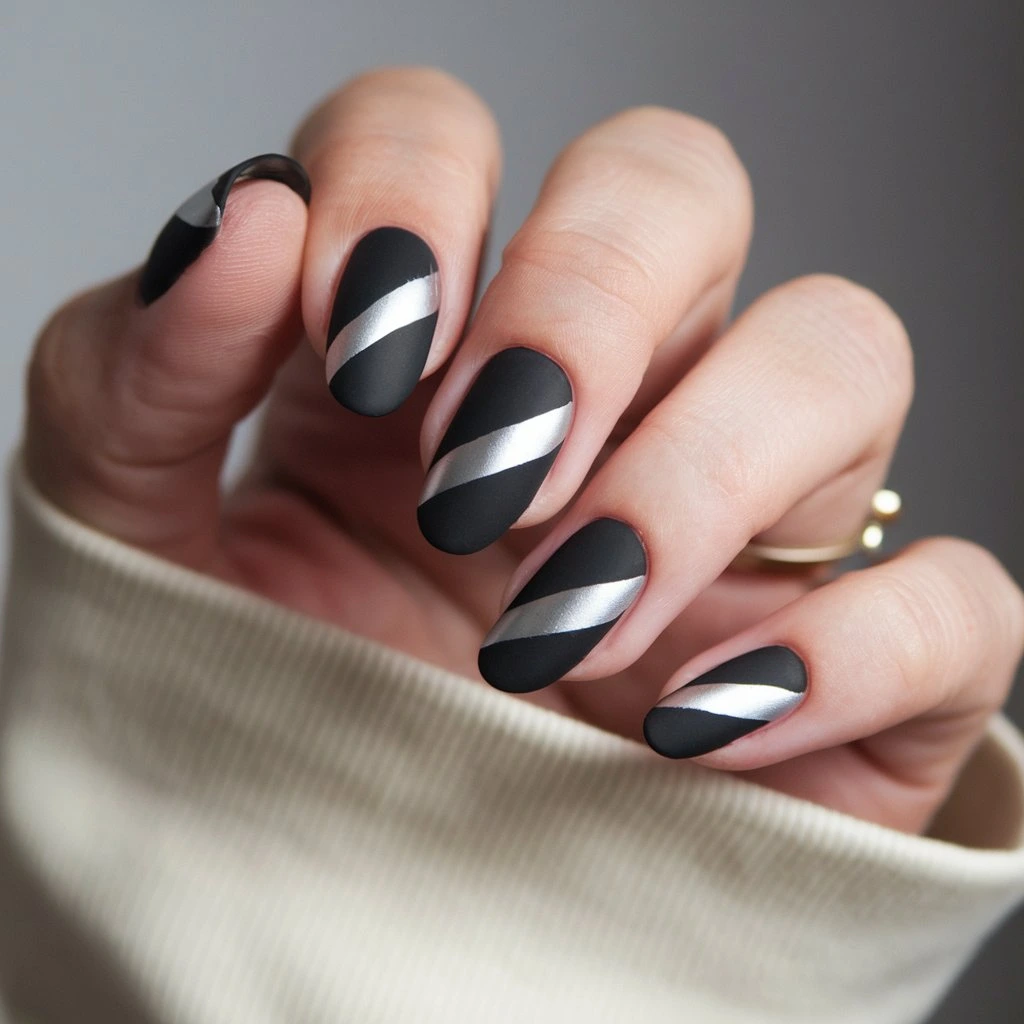
Create a striking nail design by combining matte and glossy finishes on the same nail. Use a matte black base with a high-gloss silver diagonal stripe for maximum contrast. Apply nail tape to ensure crisp, clean lines between textures.
2/28
Velvet Effect Nails
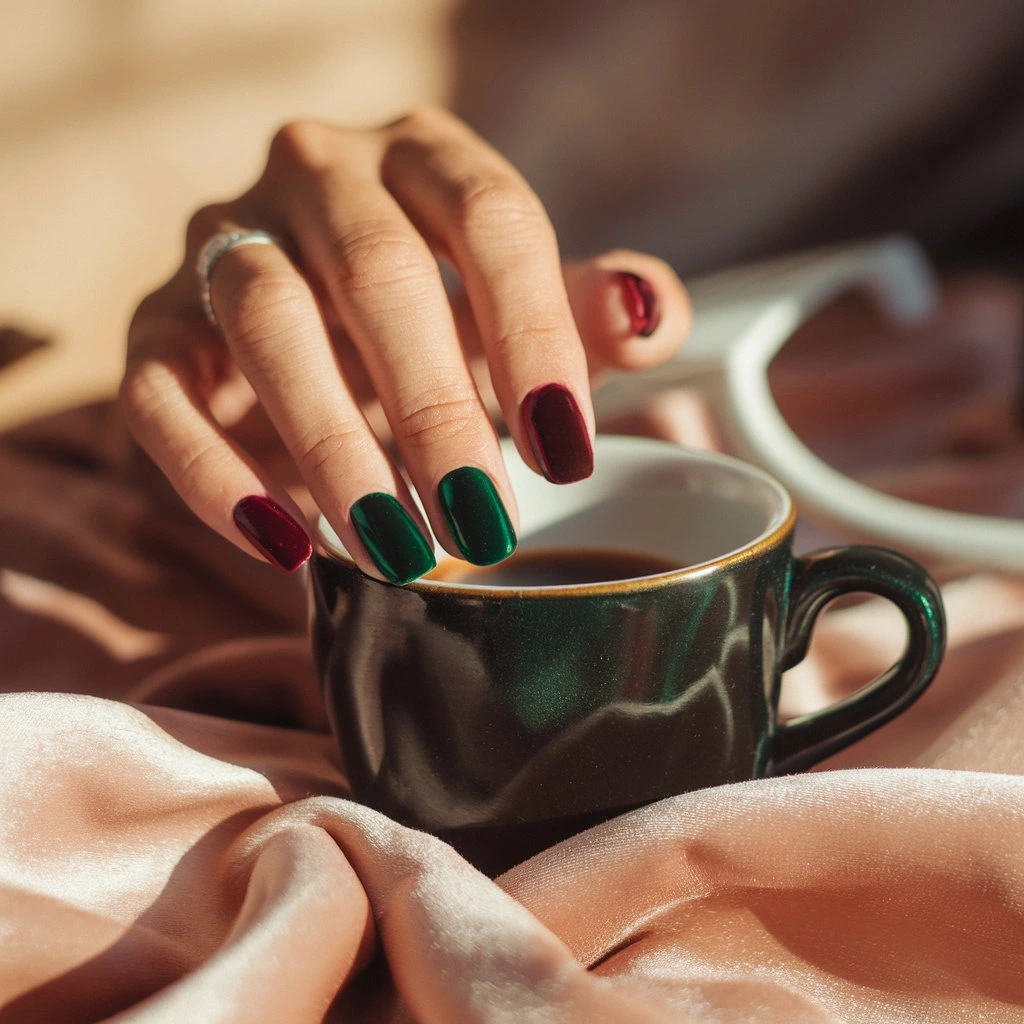
To get this simple nail design, use flocking powder in rich jewel tones like deep burgundy or emerald green to get the plush, touchable texture. Apply the flocking powder while the polish is still wet, then seal lightly with a top coat for that luxurious, velvety finish.
3/28
Neon French Tips
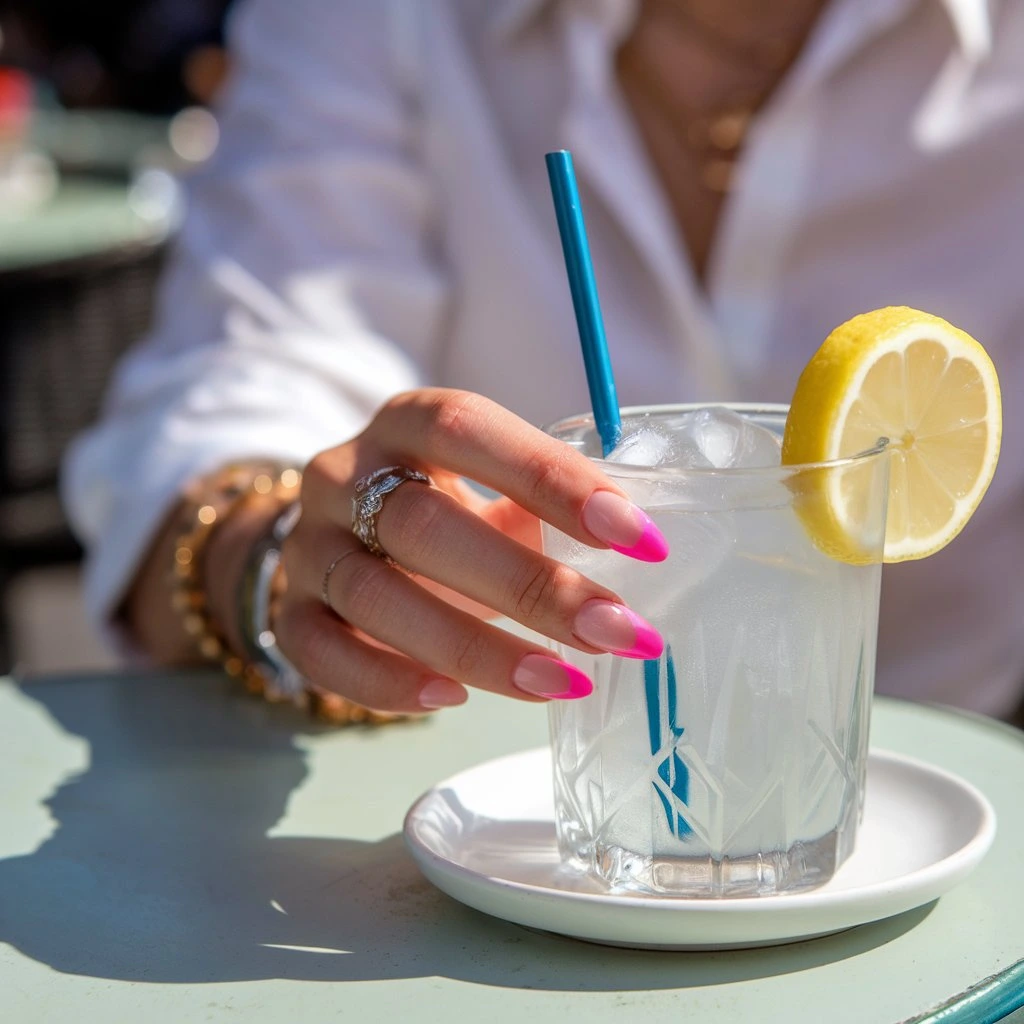
Modernize the classic French manicure by replacing traditional white French tips with vibrant neon colors. Choose a nude base to make the neon pop dramatically. Opt for hot pink to inject summer energy into your look. Use nail guides to create clean, precise lines.
4/28
Micro Florals

I painted tiny daisies on my nails, I felt like I was wearing a little piece of spring everywhere I went. You can also try this with a fine-tipped brush or even a toothpick (my go-to when improvising). Go for soft, spring-inspired shades like pale pink, lavender, or mint green they add such a whimsical, feminine touch to your nails.
5/28
Two Tone Diagonals
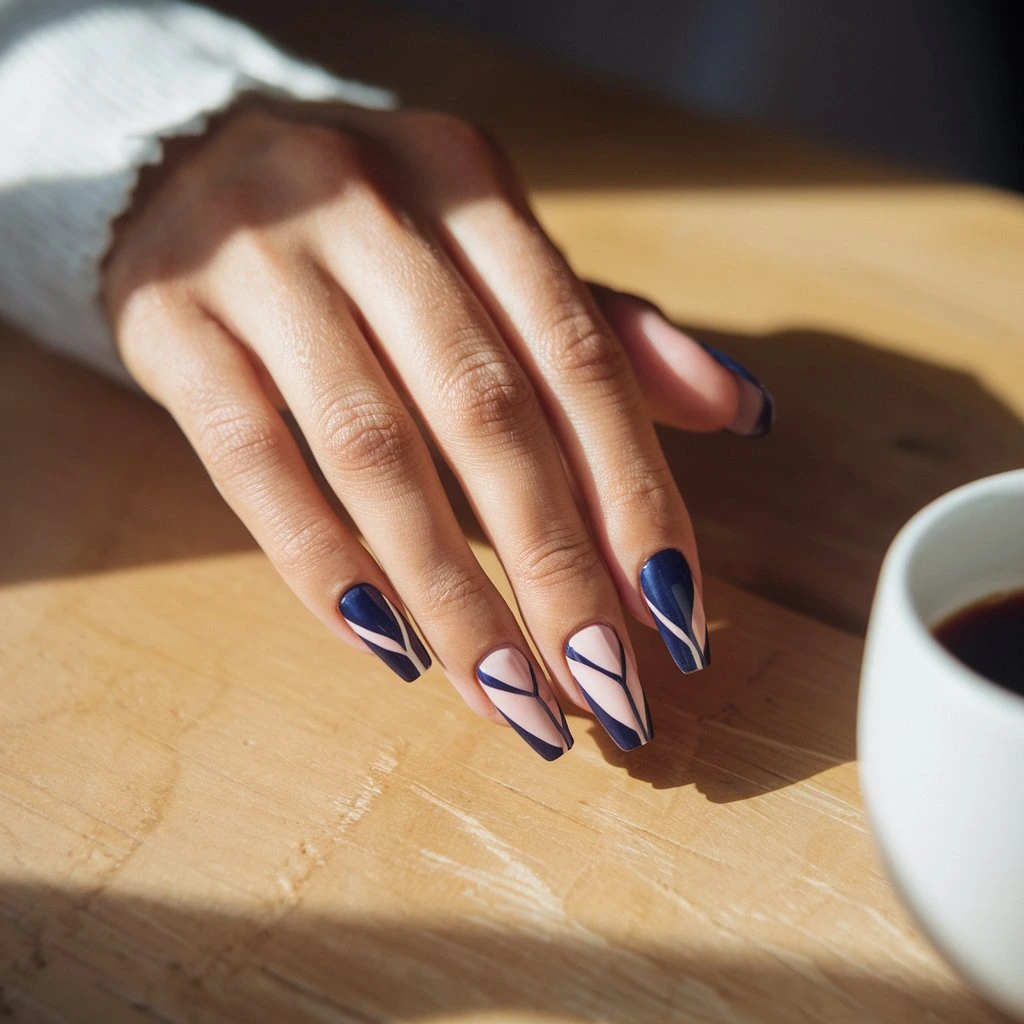
I love how versatile and bold two-tone diagonals can be. I paired navy blue with blush pink, and it turned out so striking! You can play around with your favorite combinations. Cobalt and pastel mint is another personal favorite of mine. Just grab some nail tape to keep those lines sharp.
6/28
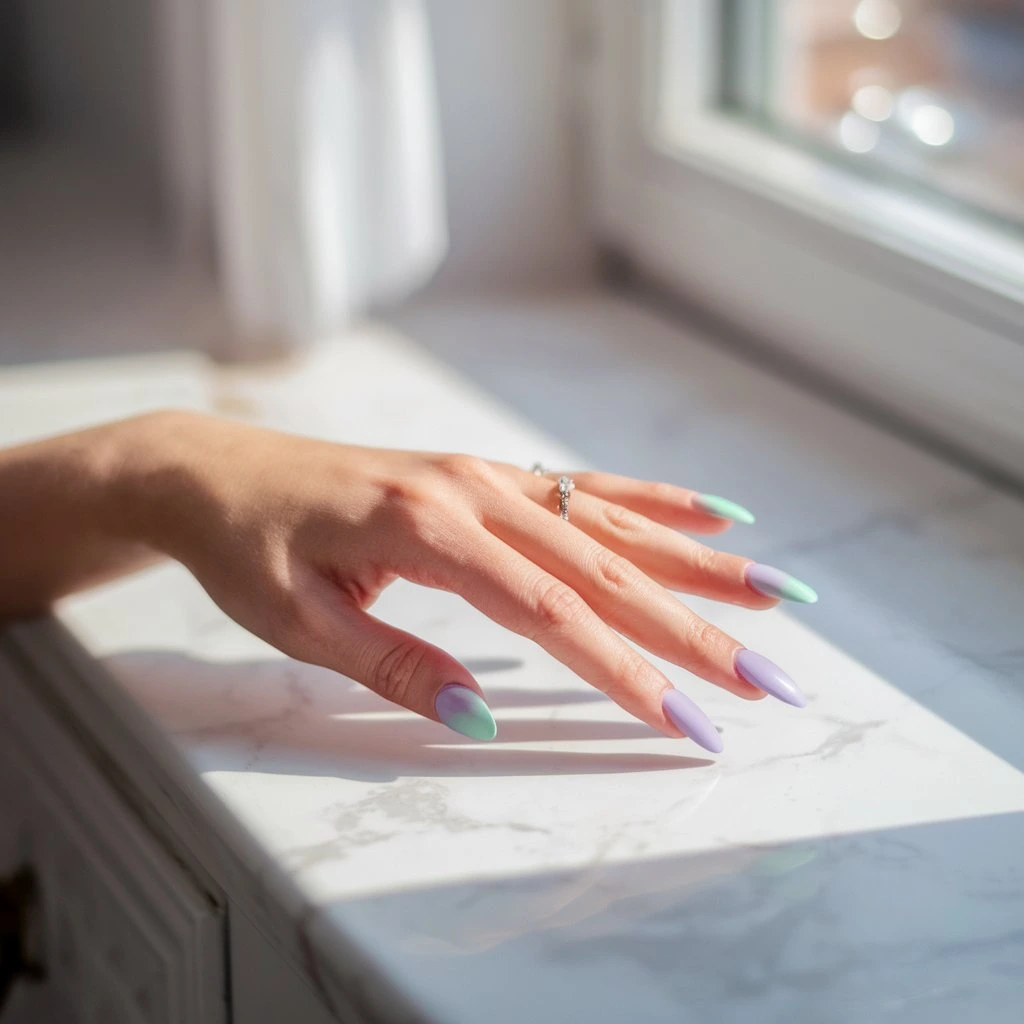
Monochrome Gradient
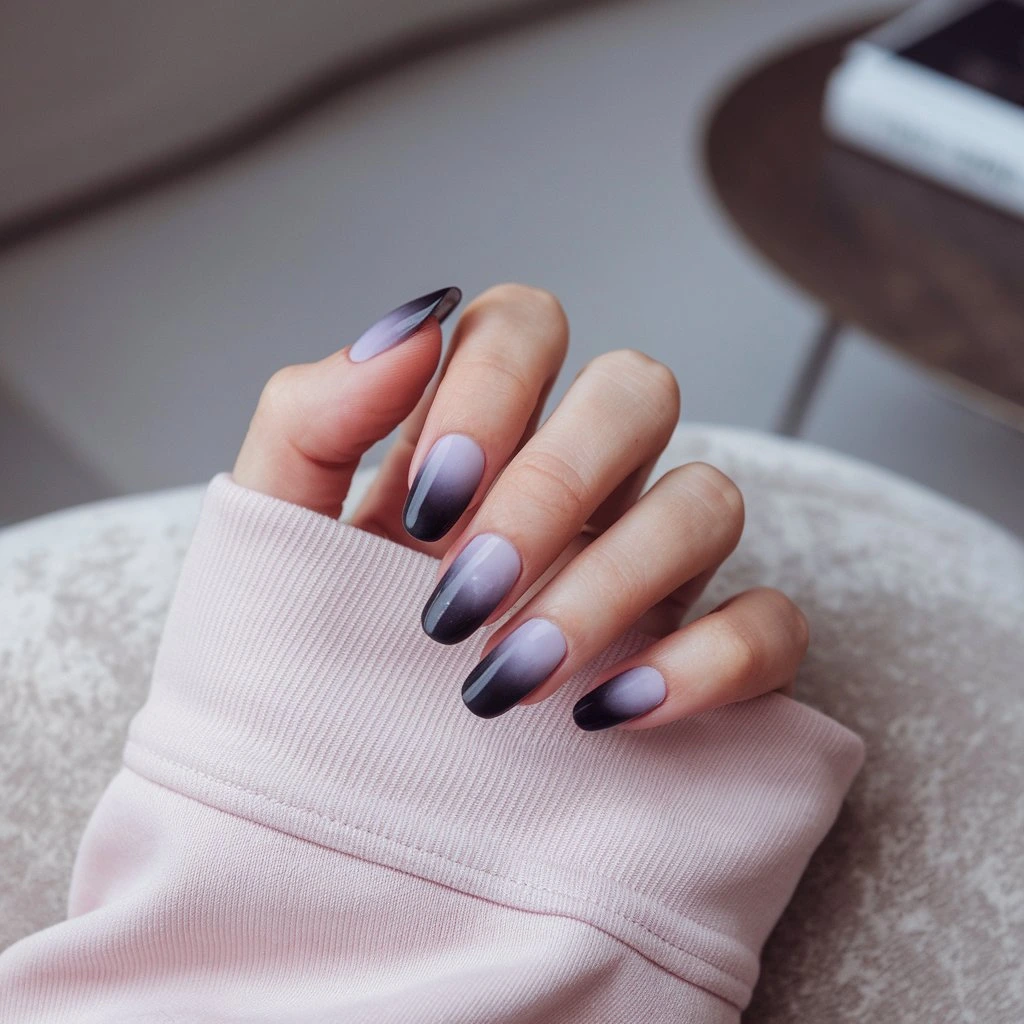
Creating a monochrome gradient feels like a mini art project. I like to transition from lightest to darkest shades across my nails. It’s a simple way to achieve a polished, cohesive look. You can use a makeup sponge to blend colors seamlessly. With lavender and gray tones, and both look so good.
7/28
Metallic Tips
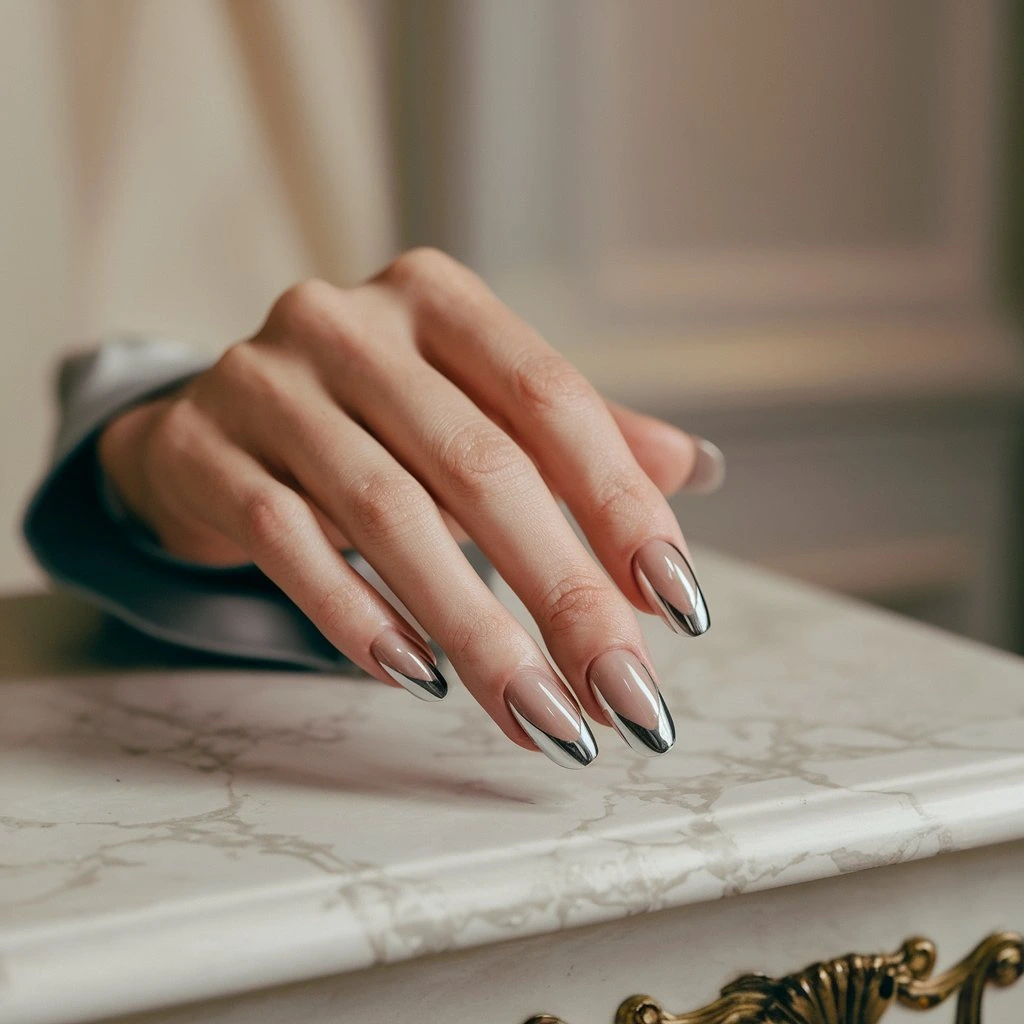
Add a subtle shine by painting only the nail tips with a metallic finish. Use chrome silver over a nude base for understated glamour. Ensure crisp lines by using nail guides or careful freehand application.
8/28
Zebra Stripes
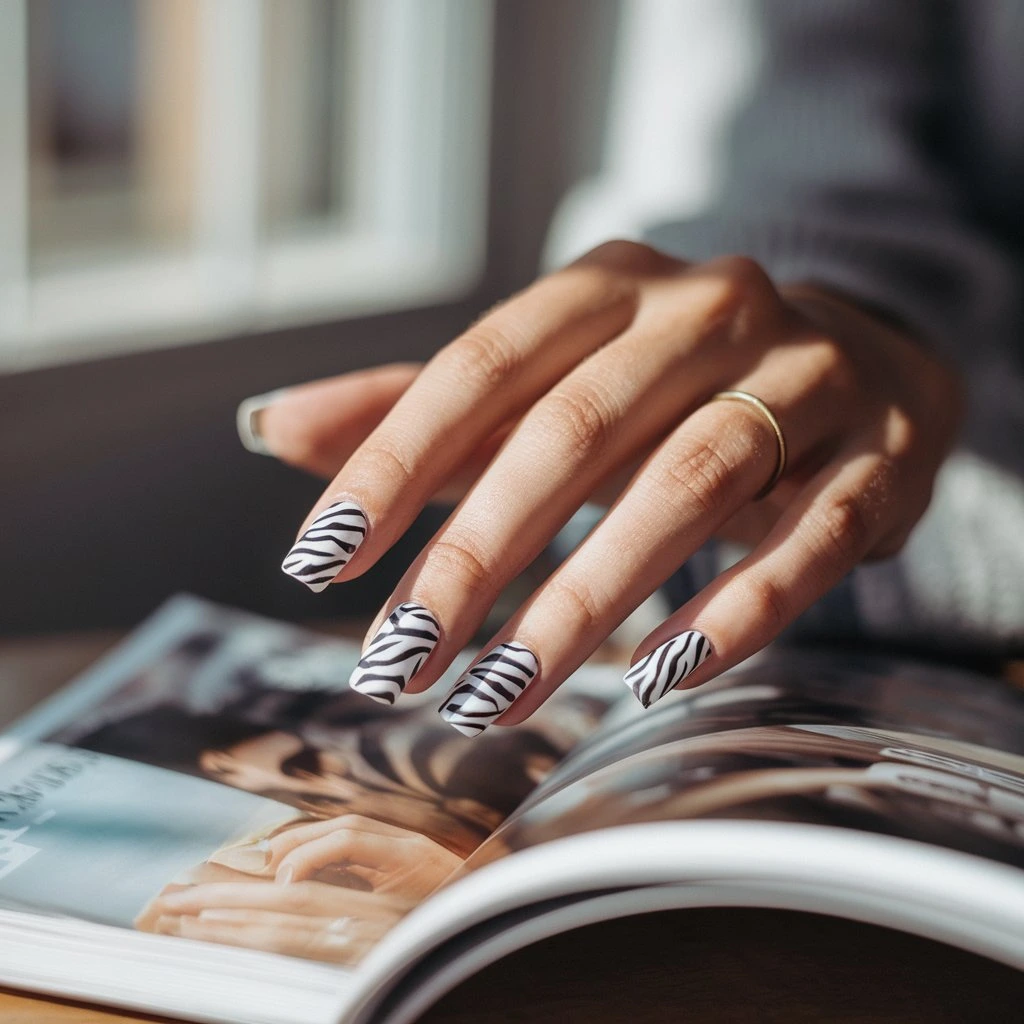
Let’s talk about fun, wild nail art that is zebra stripes! I’ve always loved how playful and edgy this look is, especially for casual outings. The trick is to keep the stripes irregular and organic looking for a more natural feel. I use a thin brush to paint the black lines over a white base, but you could also switch it up with bold colors if you’re feeling adventurous.
9/28
Polka Dot Party
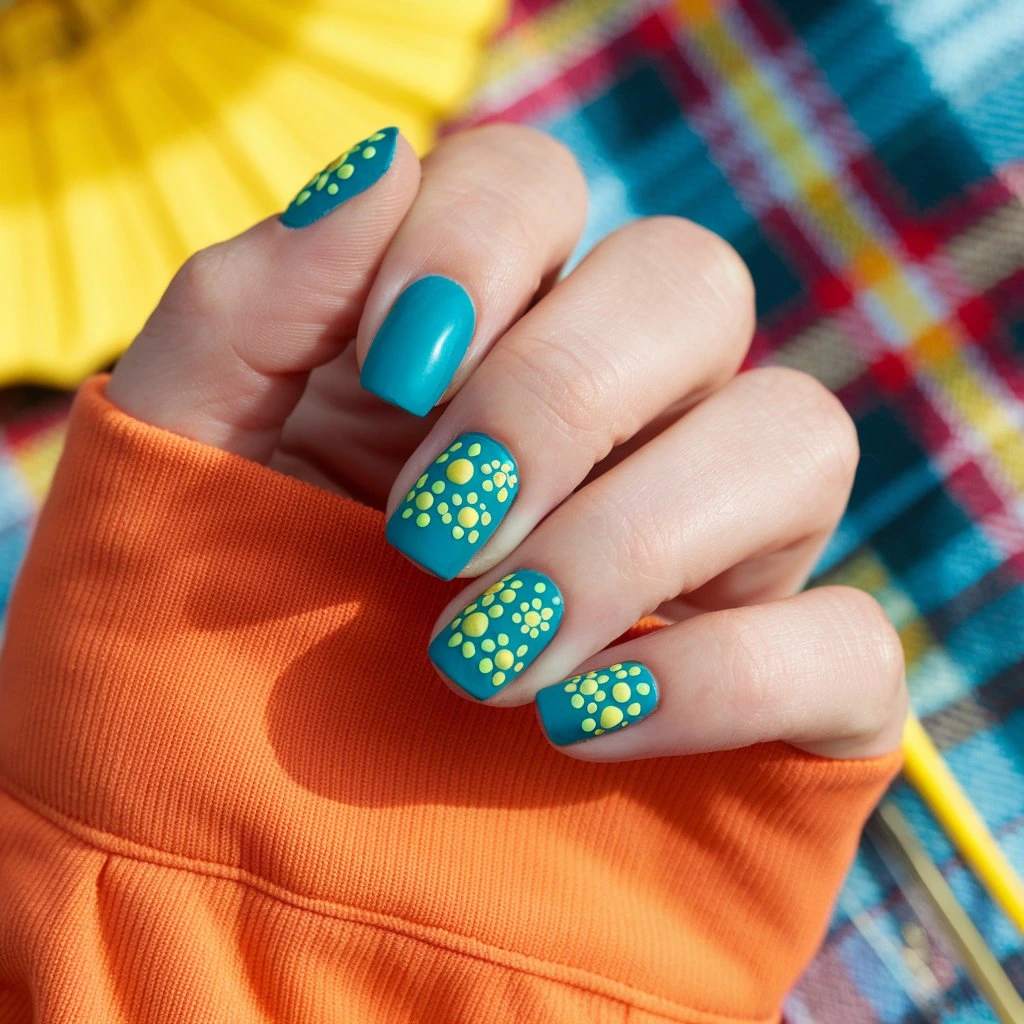
The last time I did this, I paired sunny yellow dots on a teal background. It was a fun, eye-catching combo! You can use a dotting tool or even the end of a bobby pin to create evenly spaced dots. Try mixing dot sizes for an extra pop of visual interest.
10/28
Plaid Prints

Plaid nails always remind me of cozy autumn afternoons. Try olive, cream, and brown tones for a warm, earthy vibe. It felt like wrapping my nails in a little flannel blanket! To get the perfect plaid, use a fine brush or nail stamping tool. Layer thin, crisscrossed lines carefully, and don’t be afraid to mix in some metallic accents for a modern twist.
11/28
Negative Space Hearts
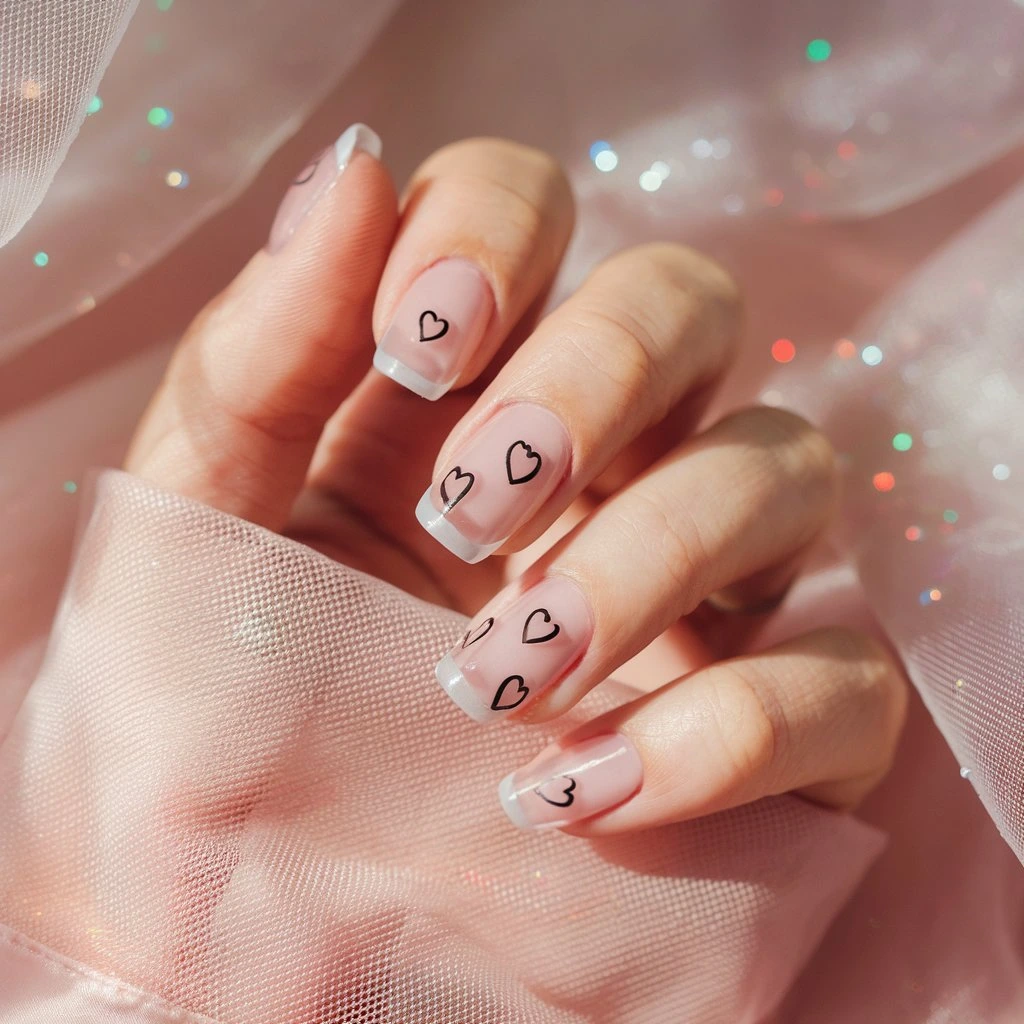
The sheer base with tiny heart outlines creates such a stylish, artistic vibe. I’ve freehanded them a few times, but stencils make it so much easier, especially for perfectionists like me! You can leave the hearts unfilled for that negative space magic or color them in for a more dramatic look.
12/28
Single Stripe Drama

A single stripe down the center of each nail with gold over a matte black base. Nail tape will help to keep those lines razor sharp.
13/28
Barely There Glitter
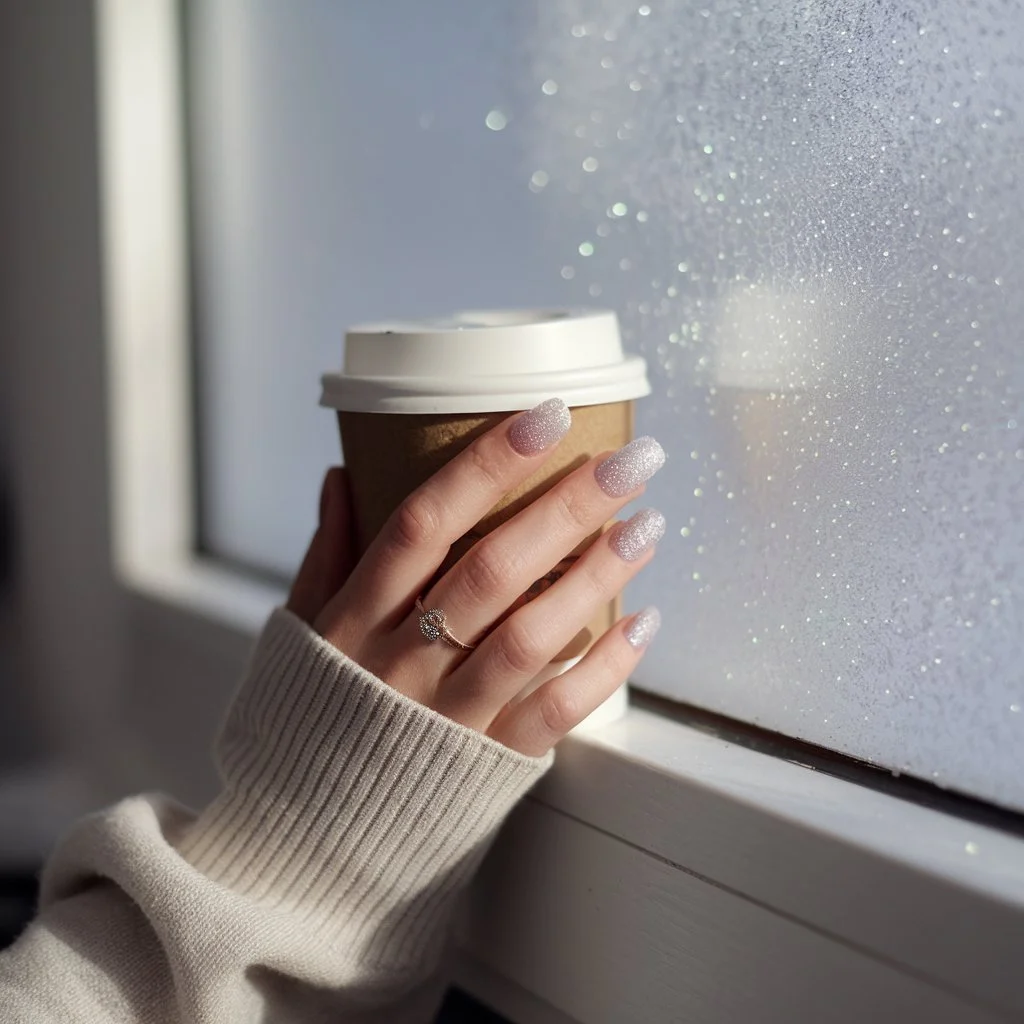
There’s something so magical about barely there glitter nails. I love dusting fine, translucent glitter on just the tips of my nails or fading it softly from the base. It’s the kind of sparkle that feels delicate, like catching the sunlight on a frosty morning.
14/28
Pumpkin Spice Perfection
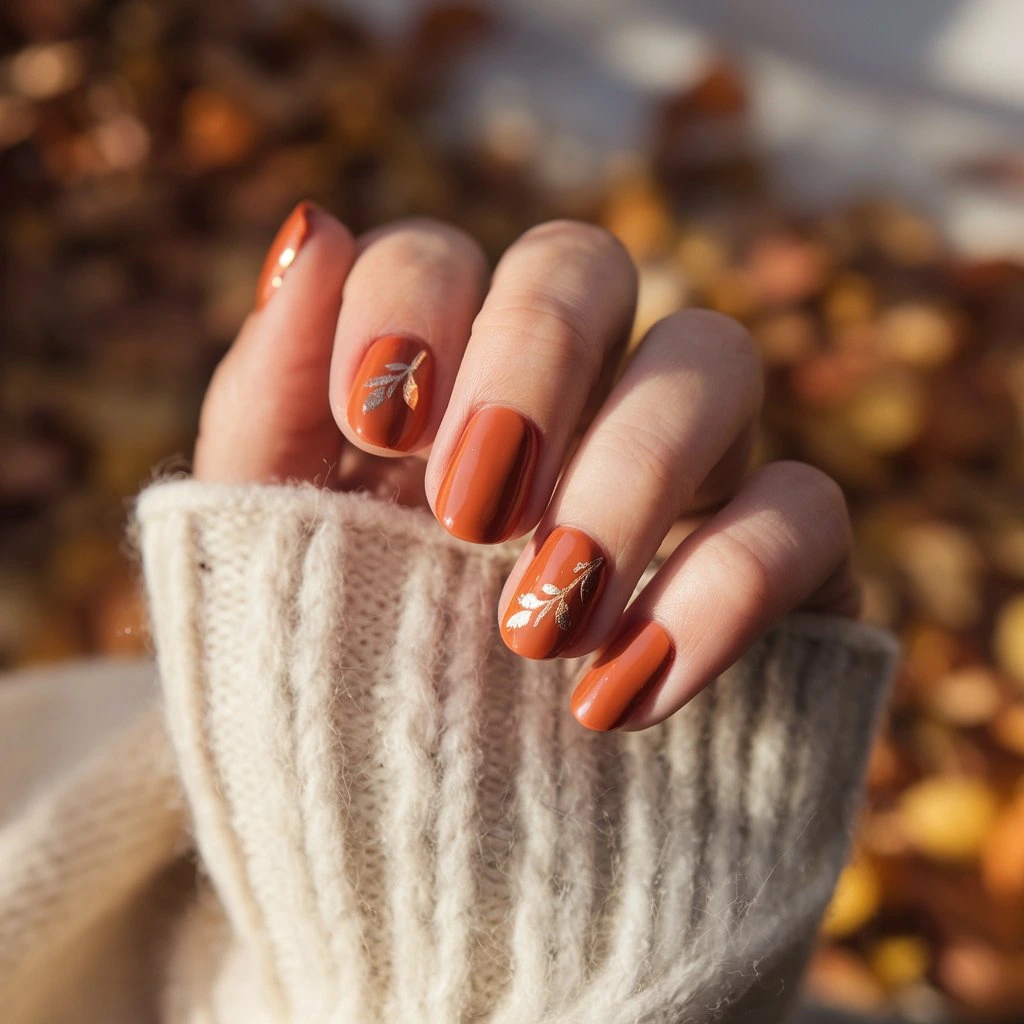
Nothing says “Hello, autumn!” quite like burnt orange nails with gold accents. Try this fall nail by adding tiny leaf details. You can use a fine brush or stamping tools to create delicate, falling leaves.
15/28
Snowflake Sparkle
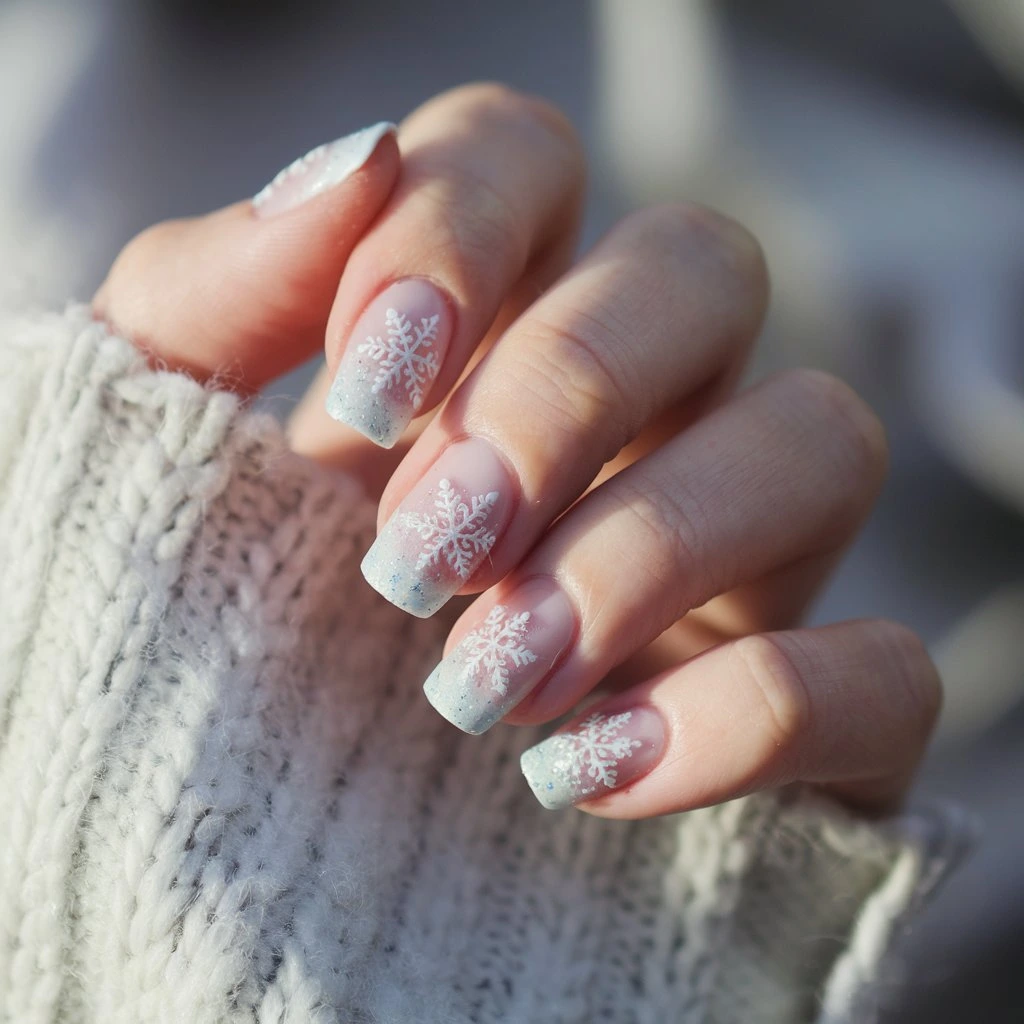
These snowflake white nail designs instantly transform your hands into a magical winter wonderland. Pair frosty white with a touch of baby blue and add a dusting of glitter it was like a snow globe for my nails! Whether you use nail stamping plates or hand paint the intricate snowflake patterns, don’t forget a top coat to make your frosty artwork last.
16/28
Pastel Ombre
Blend lavender and mint green. The trick is using a makeup sponge to create that seamless gradient effect.
17/28
DIY Splatter Art

Try vibrant neon shades over a crisp white base. The key is embracing the imperfection. Randomness is what makes this design so unique.
18/28
Color Block Corners
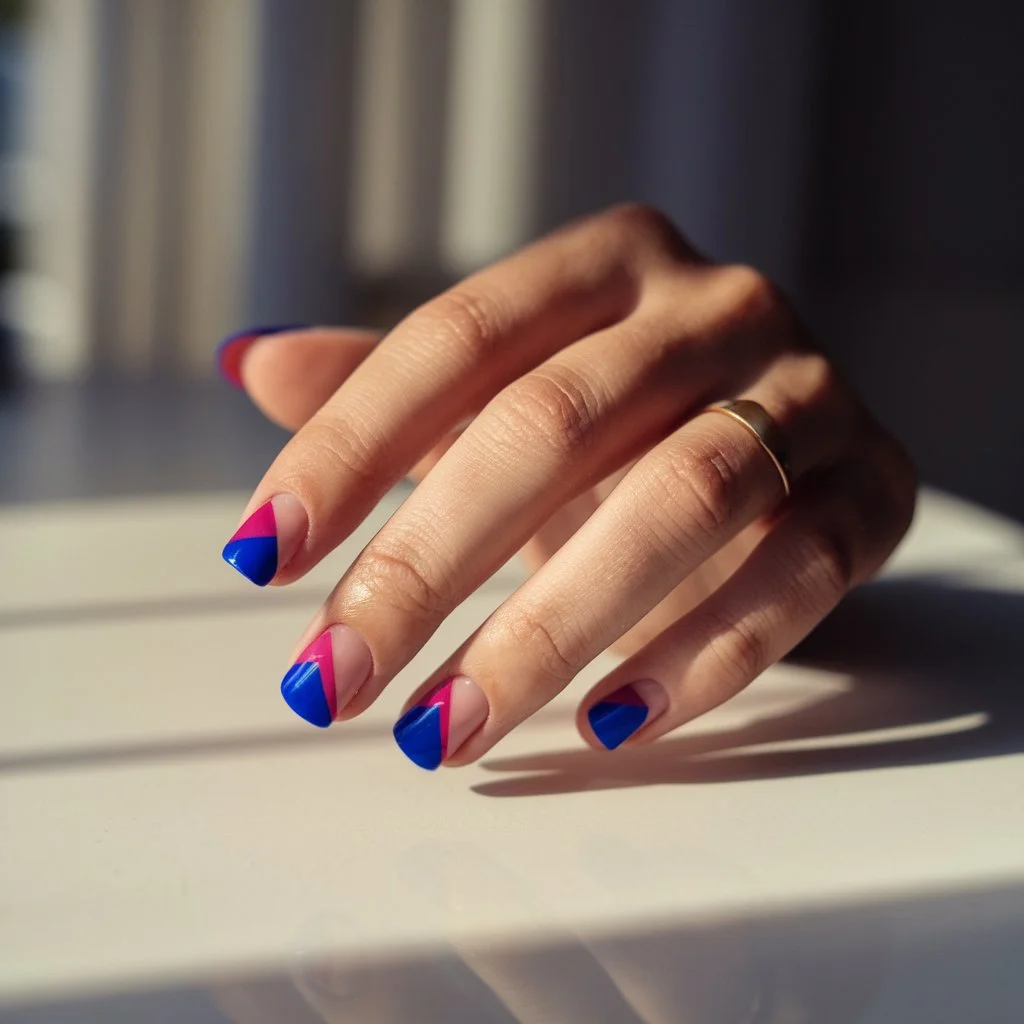
Small triangles painted in bold, contrasting colors like cobalt blue and magenta turn your nails into mini canvases. Pair it with a neutral base to make the colors pop. Use nail tape to get sharp, geometric shapes.
19/28
Palm Leaves
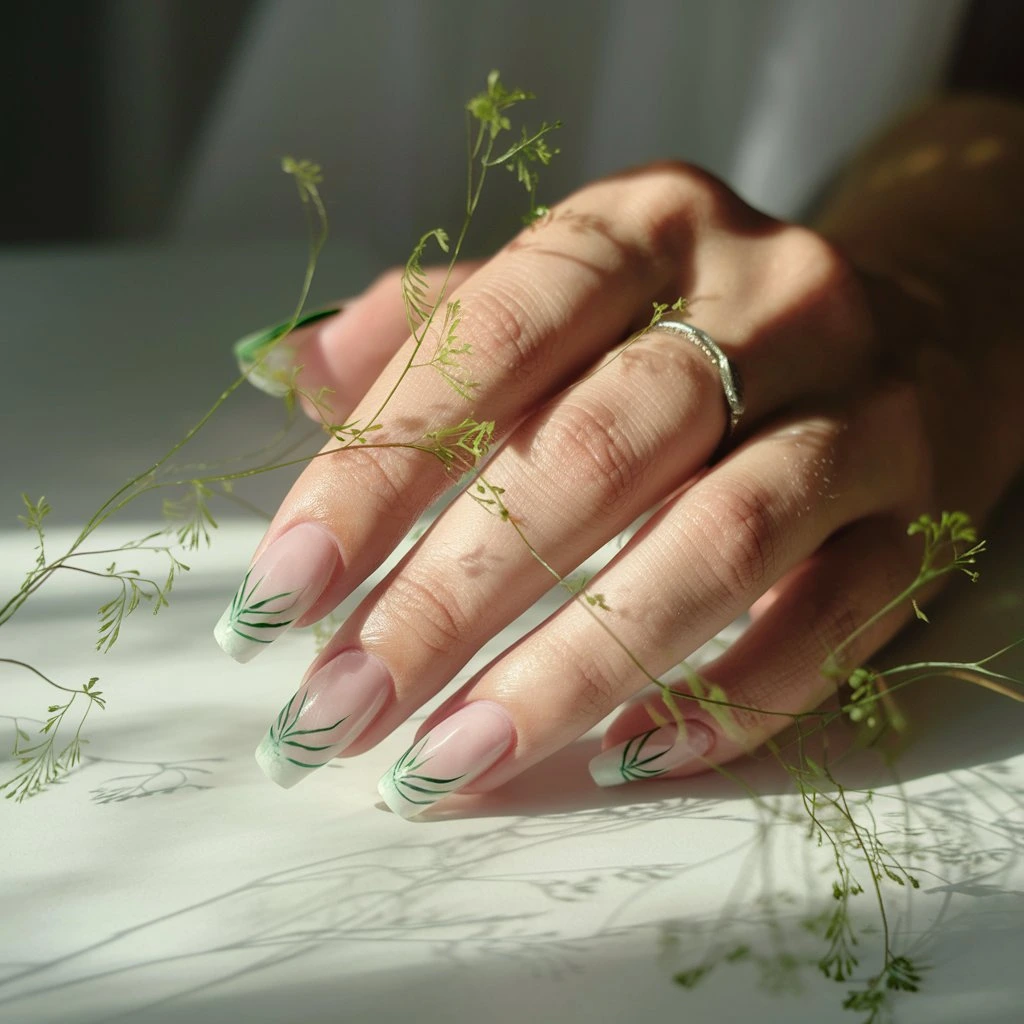
Bring the vacation vibes to your nails with this simple nail design. Paint fine green fronds over a sheer base. Use a thin brush to create realistic details, layering different shades of green for depth.
20/28
Galaxy Nails
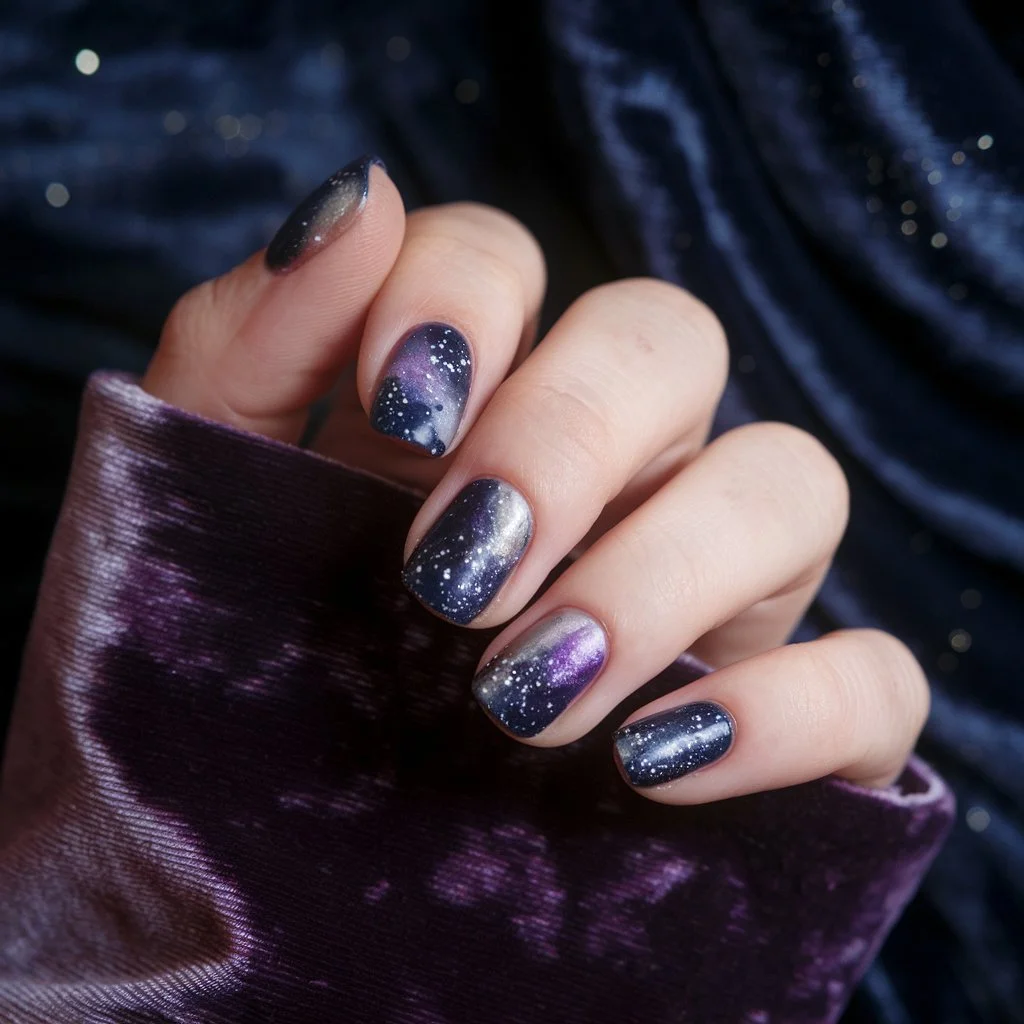
I sponged on navy, purple, and silver polishes, adding white specks for stars. It felt like carrying a piece of the cosmos wherever I went. The secret is blending the colors seamlessly with a makeup sponge to create that ethereal, cosmic glow. Add a touch of glitter for extra sparkle.
21/28
Marbled Earth Tones
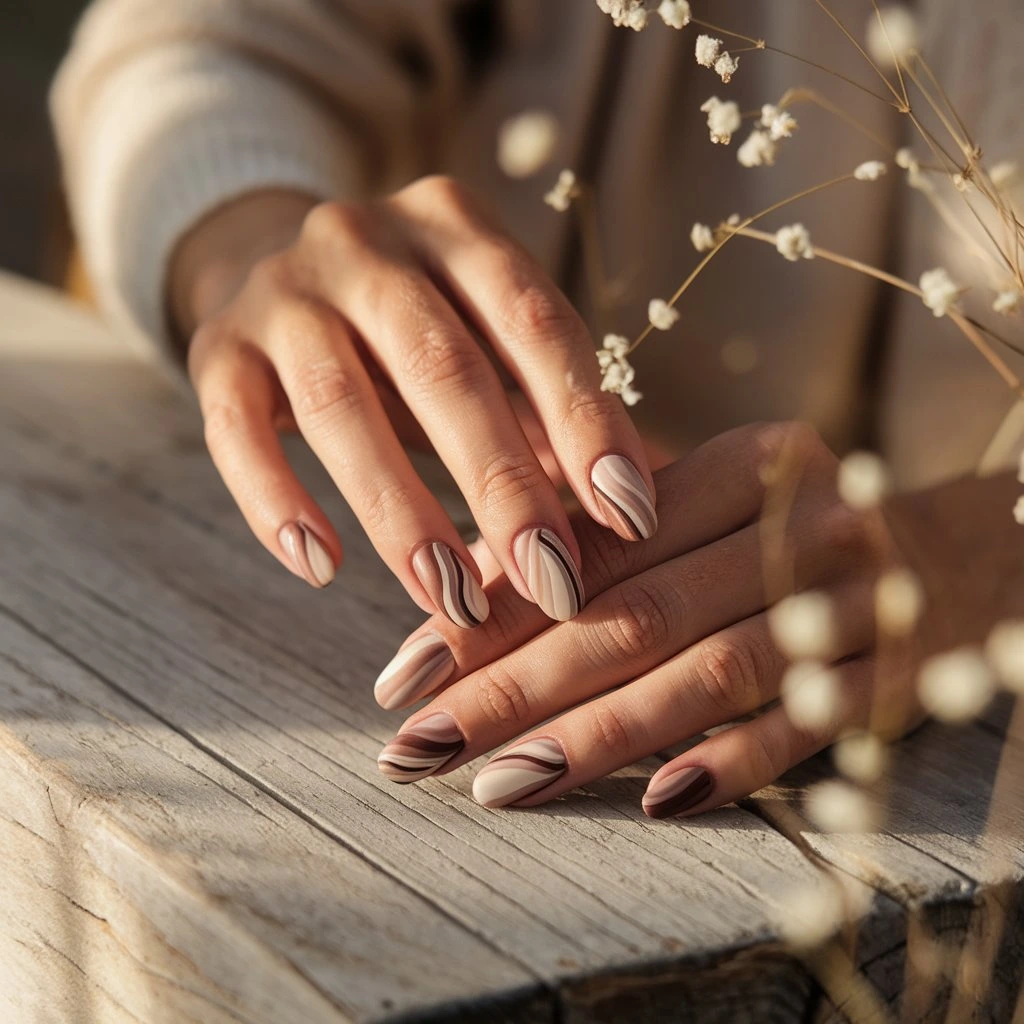
Try muted browns and creams. Use a toothpick or fine brush to create organic, flowing patterns, blending softly for a natural effect.
22/28
Fruit Slices
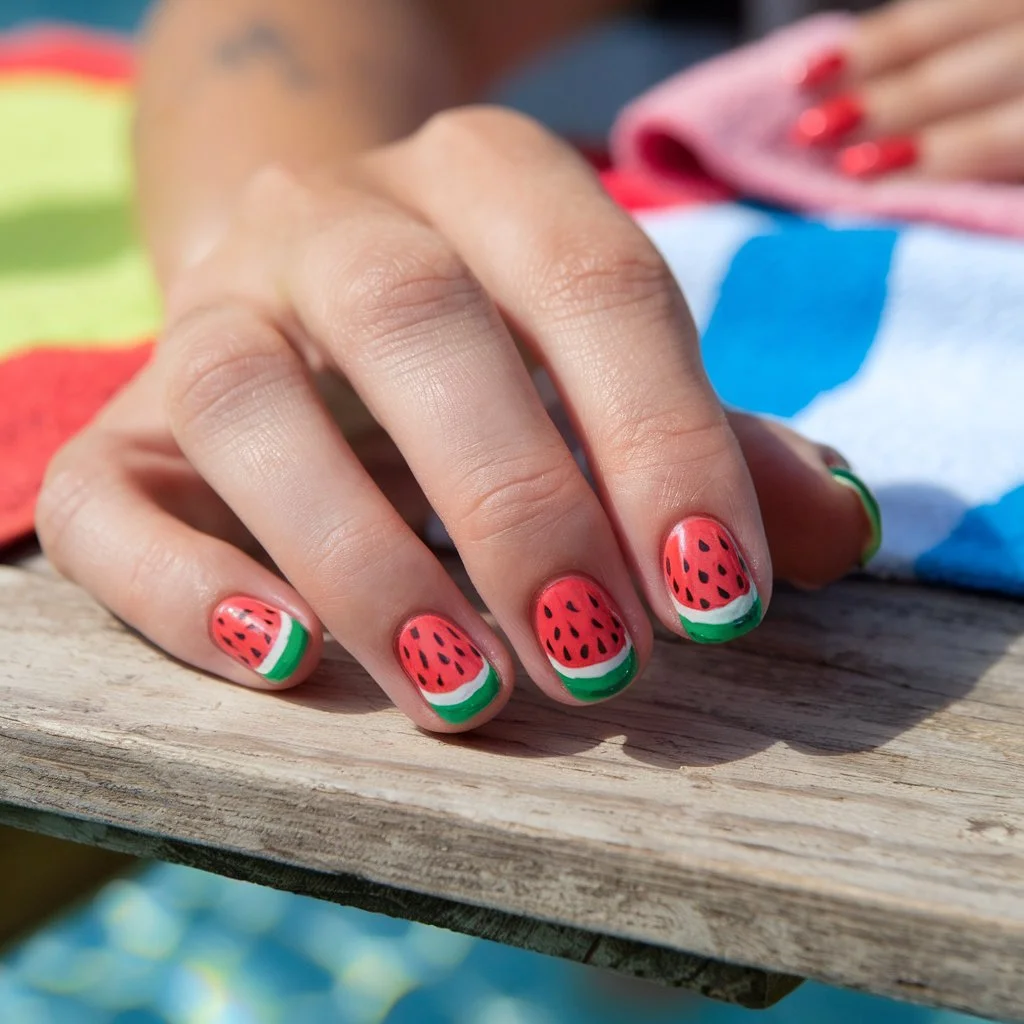
Paint tiny lemons and watermelons on my nails, they became the hit of every picnic and pool party. Use a fine brush to create realistic fruit patterns and choose bright, cheerful colors to capture the sunny vibe.
23/28
Checkerboard Chic
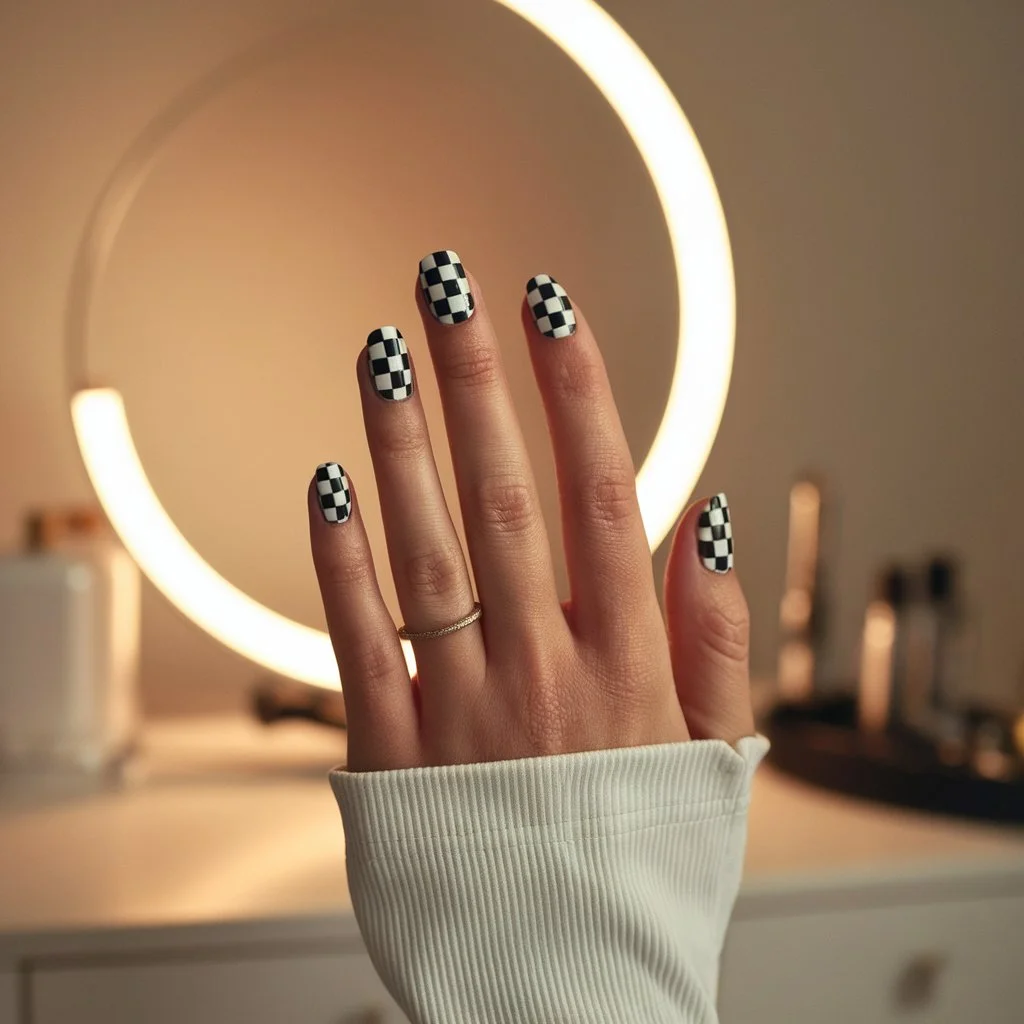
Black and white checkerboard pattern it’s a bold, graphic design that screams high fashion. Nail tape can be used for creating evenly spaced squares. You can try this black and white nail with a monochrome outfit.
24/28
Floating Shapes
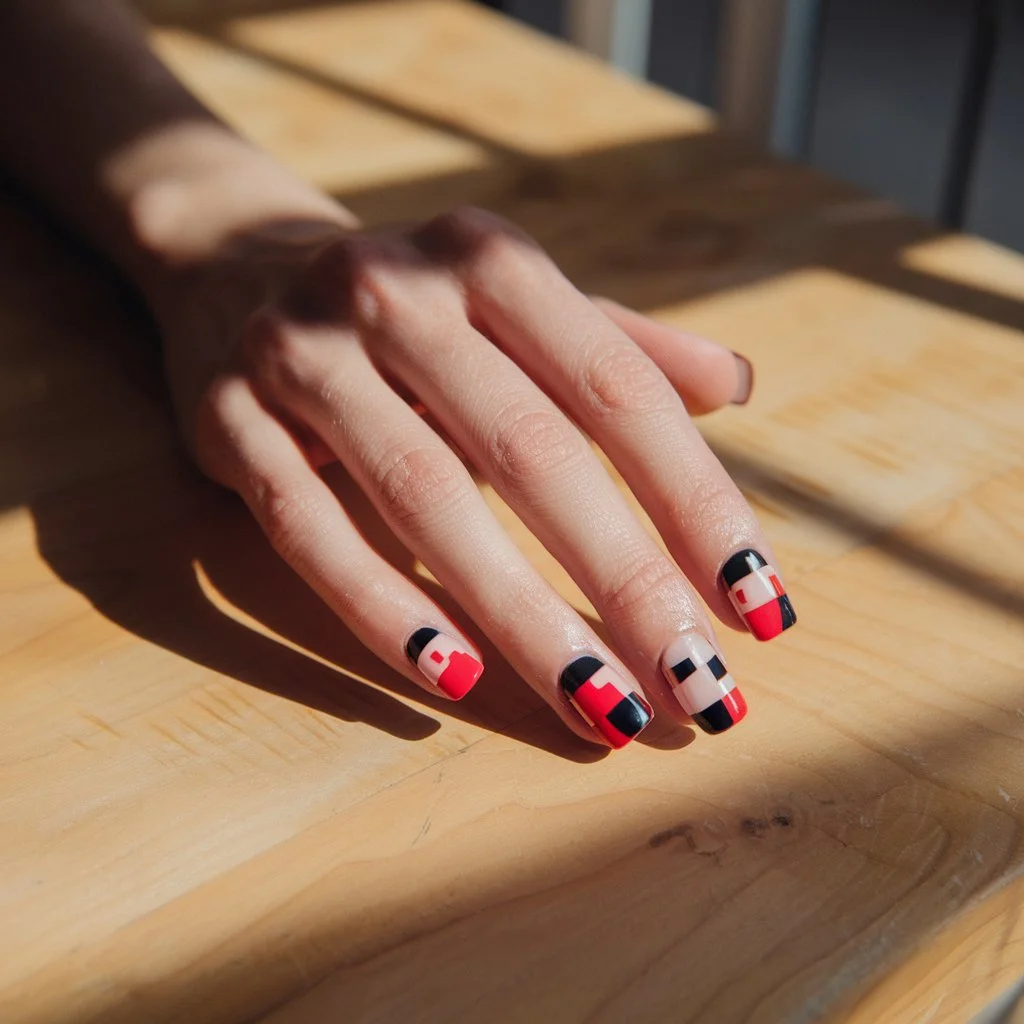
Geometric shapes take center stage with this modern, abstract design. Think tiny circles, squares, and triangles scattered across your nails in bold colors like red, cobalt blue, or neon yellow. The “floating” effect creates a contemporary, art-inspired look that’s fun and easy to customize. Use contrasting shades for maximum impact, and don’t forget a clear top coat for that perfect finish.
25/28
Drip Design
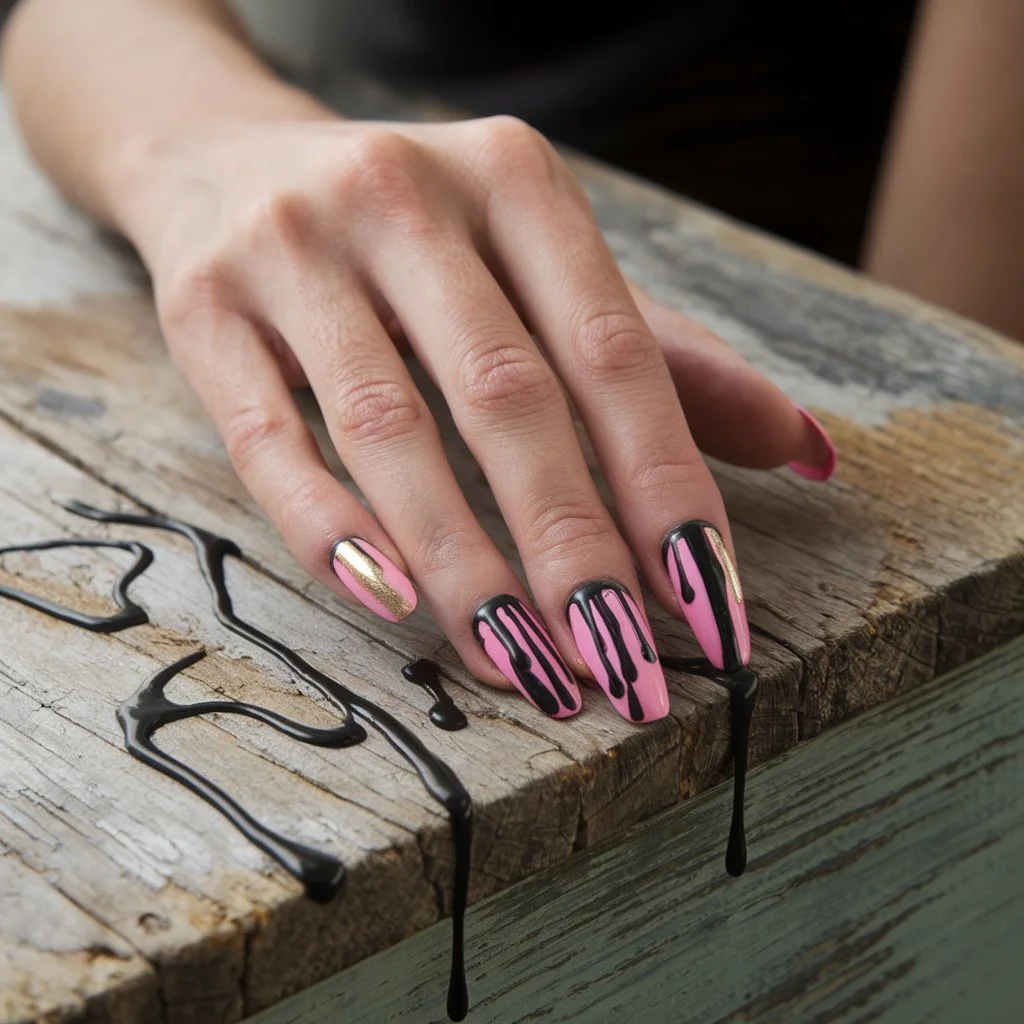
Bring the drama with edgy drip designs that look like wet paint sliding down your nails. Black drips over neon pink bring a rebellious vibe, but feel free to mix it up with pastels or metallics for a softer edge. A thin brush is key for crafting realistic, organic drips.
26/28
Chrome Overlays
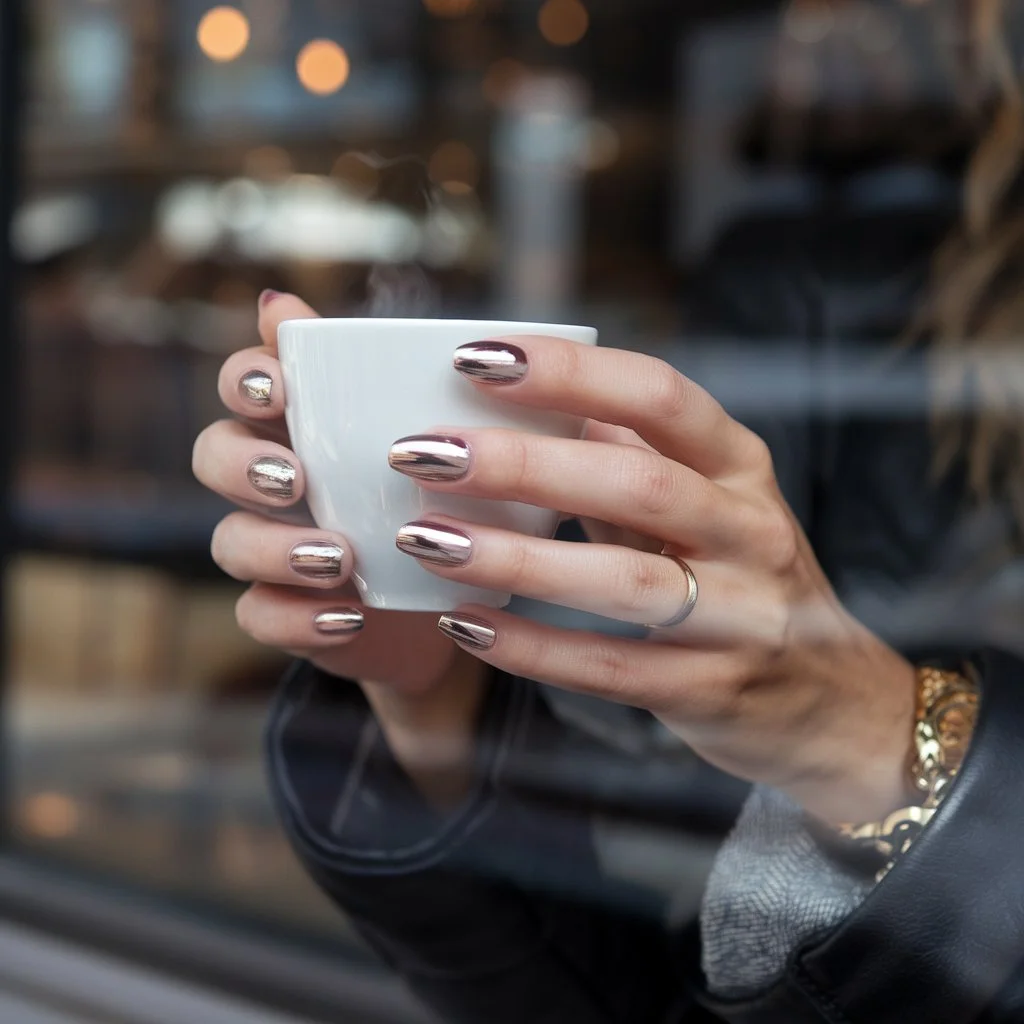
Step into the future with chrome overlays that bring a mirror-like finish to your nails. Rose gold and holographic silver are must-try shades for this design. Apply chrome powder over a jet-black base, and the result will be mesmerizing.
27/28
Retro Smiley Faces

Mustard yellow as the base color, paired with black smileys.
28/28
Comic Book Effect
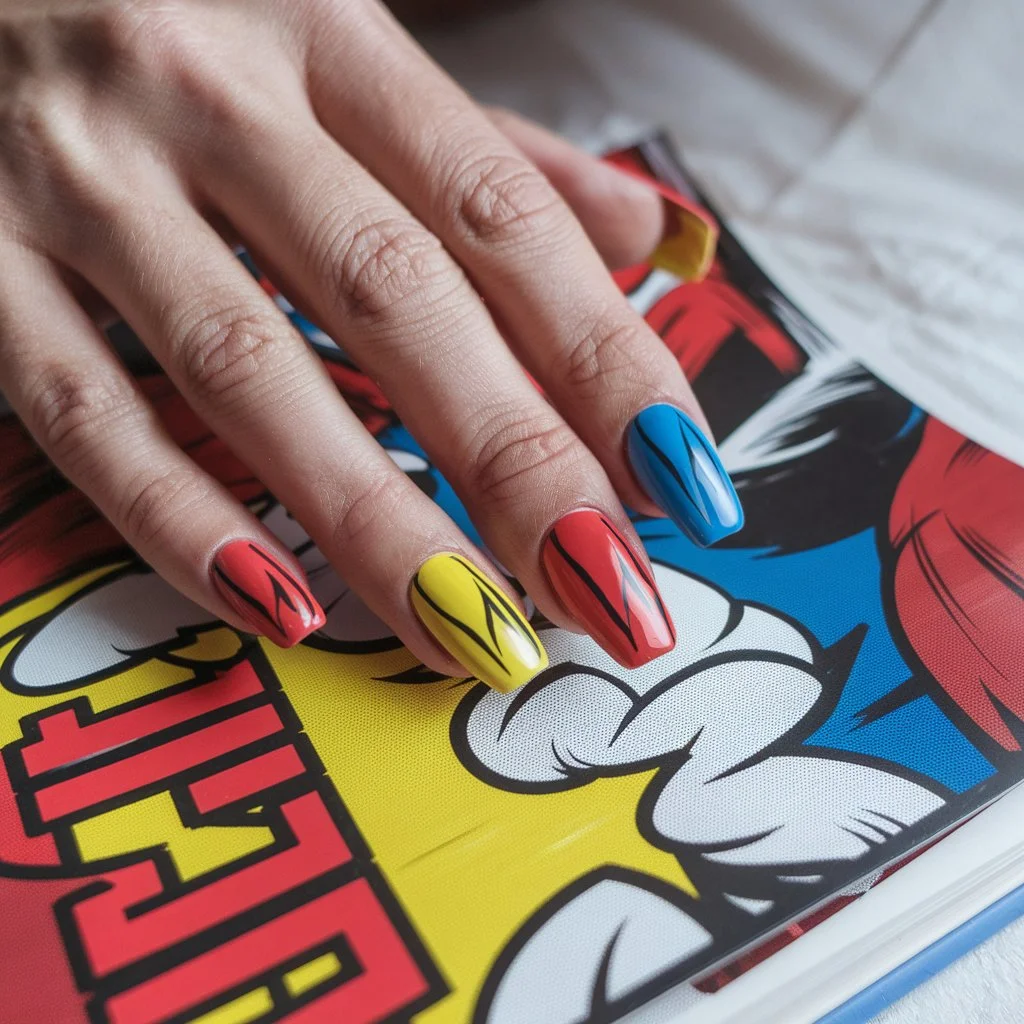
Take your nail game to a whole new level with a comic book-inspired design. Bold black outlines and strategically placed white highlights give your nails that signature 2D, pop art vibe. High-contrast colors like red, blue, and yellow enhance the graphic effect.
Trending Nail Design Concept
Chrome Nails
- The mirror-like metallic finish of chrome nails creates an ultra-polished, high-shine effect that’s both modern and striking.
- Whether you opt for classic rose gold, sleek silver, or futuristic holographic tones, chrome nails are versatile enough to complement any nail shape. From stiletto to square. The metallic finish ensures they always look fresh and fashionable, no matter the season.
- You’ll need chrome powder and a precise application technique, including buffing and sealing the nails, to get that perfect mirror effect. While the results are stunning, this design can require some extra time and skill to achieve. As someone who’s tried countless nail art trends, the results of chrome nails are absolutely worth the effort!
Simple Nail Art Tips
Maintaining Your Design
After putting in the effort to create the perfect nail art, you’ll want to ensure it lasts as long as possible. Here’s how to maintain your design:
Quick-Dry Top Coat
Opt for a salon-quality quick-dry top coat like Seche Vite, which will prevent smudging and peeling. Not only does it lock in your design, but it also adds a glossy finish, giving your nails that salon-perfect look that stays fresh longer.
Wear Gloves
Household chores and water exposure are the silent enemies of your manicure. Opt for latex or nitrile gloves, as they provide a snug fit and keep water out, preserving both your design and nail health.
Cuticle Oil
Hydrated cuticles are the secret to a polished look. Use a vitamin E-infused cuticle oil daily, massaging it in to promote nail growth and keep your design crisp and photo-ready.
Touch Ups
When designs chip or fade after 5-7 days, touch up the edges with matching polish and reapply your top coat to refresh your manicure.
Essential Home Nail Art Kit
Here’s what you’ll need to start your nail art adventure:
Base Coat & Top Coat
These are your foundation and sealant for long-lasting results.
Nail Striping Brush
Perfect for creating delicate lines, from pinstripes to geometric shapes.
Dotting Tools
These are a must-have for creating everything from classic polka dots to more intricate flower petals. For beginners, start with dual-ended tools that offer a variety of dot sizes.
Nail Tape
Helps to achieve clean, sharp lines when creating geometric patterns.
Small Detailing Brushes
Investing in high-quality detailing brushes for intricate designs like florals is good.
Nail Polish Remover & Cotton Swabs
Use an acetone-based remover for stubborn polish and precision cotton swabs to clean up around cuticles without ruining your design.
Cuticle Pusher
Opt for a stainless steel cuticle pusher, which is more durable and hygienic. Gently push back your cuticles after a warm soak for the best results.
Your Nail Art Journey
Think of these 28 designs as your roadmap, whether you’re recreating an ombre sunset look or experimenting with negative space art. It’s all about having fun and breaking the rules creatively. Whether you’re drawn to bold or rhinestone-packed Euphoria-inspired nails, your nails become the ultimate canvas to showcase your unique personality. Let your imagination run wild, experimenting with both timeless designs and trending techniques. Most importantly, enjoy every step of your nail art journey!
SEE ALSO: 25 Christmas Nail Designs For You
A lover of all things fashion and beauty. I’ve been captivated by the magic of fabrics, colors, and makeup that let us express our inner selves. From my first sketchbook full of outfit ideas to discovering the perfect shade of lipstick, fashion has always been my happy place. With years of experience writing in the fashion and beauty industry, I’ve had the joy of collaborating with top brands and sharing my expertise through styling tips, beauty tutorials, and trend forecasts.


